In the Visual Tour of Excel’s Coding Dojo series, we delved into the VBA editor’s menus, toolbars, and windows. Now, there’s quite a few of them. So, like most developers, you’ll develop preferences that suit your workflow soon enough. Fortunately, the editor robustly supports customization. In fact, many of these ease the adoption of coding best practices. In this article, we explore the VBA editor customization that the Options dialog box avails.
Before we get started, there is something you should know. No, I haven’t perpetrated some heinous deed – not that I recall, at least. Note that any VBA editor customization done in Excel affects other Office applications on your computer.
On a side note, this article is one in a series of three on VBA editor customization. Listed below, for easy reference, are links to the other posts in the series:
- VBA Editor Customization: Menus, Toolbars and Toolbox
- Customizing Projects using the Project Properties Dialog Box
Accessing the Options Dialog Box
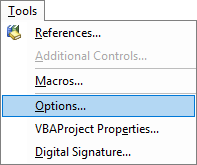
The Options dialog box lets you adjust the VBA editor’s behaviour, interaction, and display. So, how do you access it? You either select Options from the Tools menu or type “Alt + T + O” to show the Options dialog box.
There are four tabs in the Options dialog box: Editor, Editor Format, General, and Docking. Each tab targets a different aspect of the VBA editor’s settings:
- Editor tab handles Code window and Project Explorer’s behaviour and interaction;
- Editor Format tab manages the Code window’s display, i.e. how the VBA code you type into it looks;
- General tab controls UserForm display, error handling, and compilation settings. Moreover, it also manages some Toolbar display and Project Explorer behavioural settings;
- Docking tab handles docking preferences for the VBA editor’s windows.
The Options Dialog Box’s Editor tab
The Options dialog box’s Editor tab lets you adjust code and window settings. The following summarizes the Editor tab’s features:
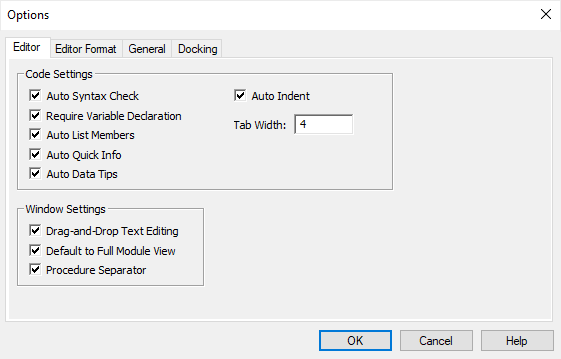
Editor tab’s Code Settings
Auto Syntax Check
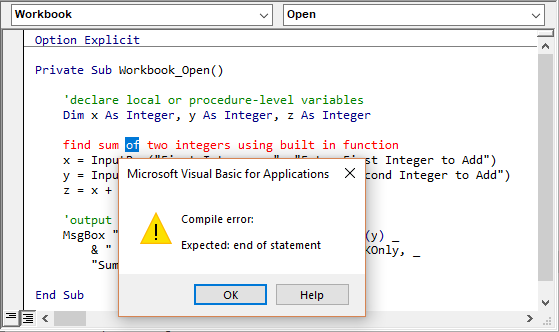
Auto Syntax Check mandates automatic code syntax checks. The checks occur right after you type each code-line. Upon finding a syntax error, the erring code-line is colour-coded and a dialog box pops-up.
The pop-up dialog box hints at the error’s nature and its likely cause. Moreover, errors are still colour-coded if this setting is inactive, but the dialog box doesn’t appear.
Require Variable Declaration
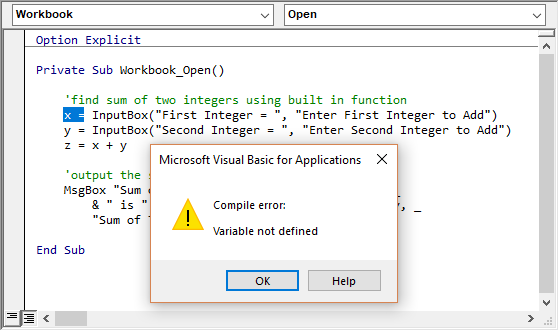
Require Variable Declaration mandates the explicit declaration of variables used in code. As a result, it auto-adds the Option Explicit statement atop all code modules created after its activation. Once activated, running code having undeclared variables trigger a compilation error.
Auto List Members
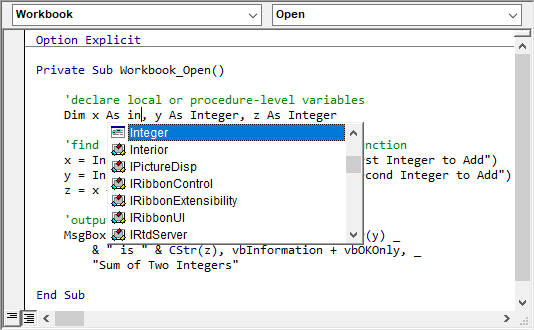
Auto List Members make the editor list object members or enumeration values as you code. So, it aids auto-completion while coding objects or enumerations — the list pops-up when you type a dot operator (‘.’) right after an object. Moreover, the list also pops-up when you type an assignment operator (‘=’) right after an enumeration.
Furthermore, you can scroll down the list to find the desired member or type its initial letters to narrow down the listing.
Auto Quick Info
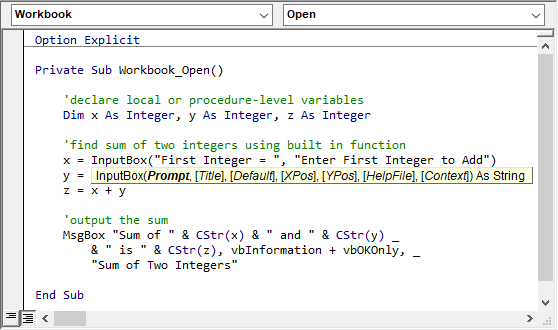
The Auto Quick Info feature enables the editor’s Quick Info feature. While you type a function, this feature displays information about its arguments.
Auto Data Tips
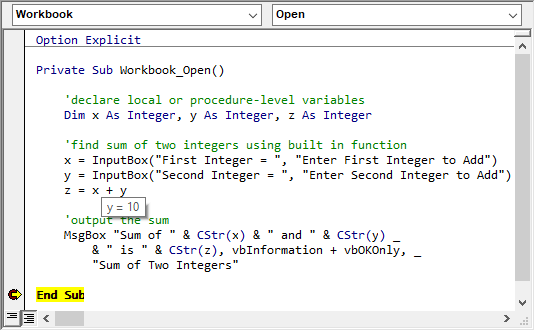
The Auto Data Tips feature enables the editor’s ScreenTips feature. It shows the value currently stored in a variable when your mouse cursor hovers over the variable. However, this feature only works while the editor is in Break mode.
Auto Indent
The Auto Indent feature ensures that each code-line has the same indentation as the line preceding it. Auto-indentation occurs when you hit Enter after typing the current code-line. However, when this feature is inactive, new code-lines begin at the Code window’s leftmost margin.
Tab Width
Tab Width sets the default number of spaces in a single Tab keypress. When you use the Tab key, the text insertion point indents by the default number of spaces. However, you can only specify a Tab Width value from 1 to 32.
Editor tab’s Window Settings
Drag-and-Drop Text Editing
Drag-and-Drop Text Editing enables dragging-and-dropping of code-blocks or text. You can drag-drop to different areas in a Code window or between Code windows. You can also drag-drop to the Immediate or Watch windows.
Default to Full Module View
Default to Full Module View ensures that code modules open in Full Module View by default. So, you can see all a module’s procedures in the Code window, rather than viewing them one at a time. However, it only applies to code modules you create after activating the feature.
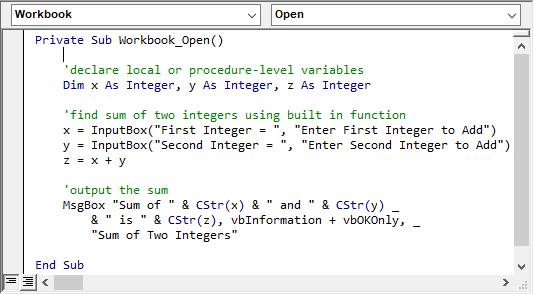
Procedure Separator
Procedure Separator ensures that Code window procedures are distinguishable from one another. It is a horizontal line that appears at the end of each procedure in the Code window. This feature is useful when you have your Code window in Full Module view.
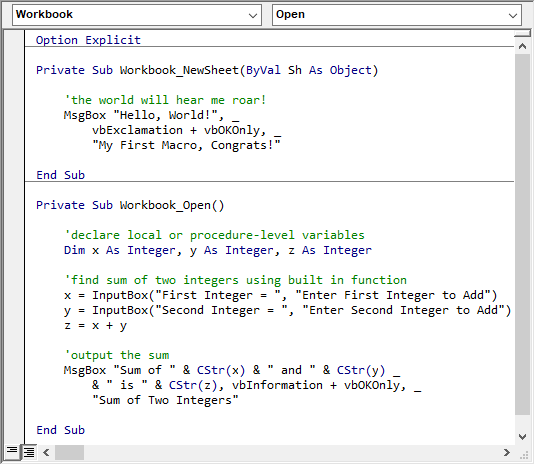
The Options Dialog Box’s Editor Format tab
The Options dialog box’s Editor Format tab lets you edit text colours and fonts. First, you’ll have to select a text category in the tab; Text categories are on the left of the tab. Afterwards, you’ll be able to edit its foreground (i.e., the text), background (i.e., text canvas), and margin indicator (if applicable).
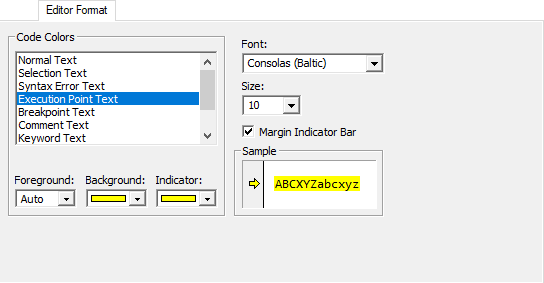
The Font, Size, and Margin Indicator bar settings selected apply across all text categories. Moreover, the Code window pops-up after you tick-on the Margin Indicator bar. Furthermore, a sample of your text category’s settings displays on the bottom right of the tab.
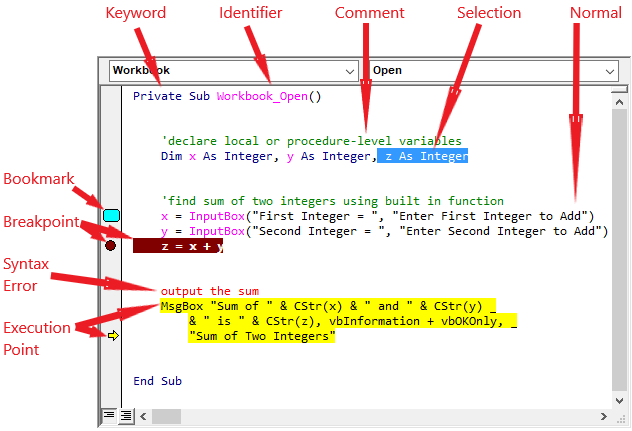
The Options Dialog Box’s General tab
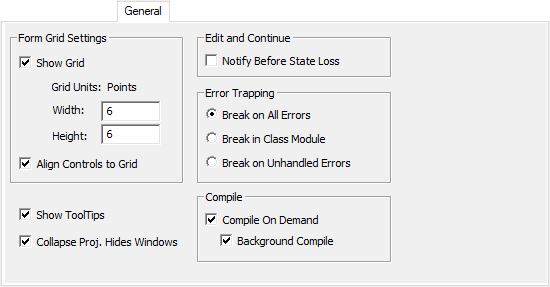
The Options dialog box’s General tab lets you edit the UserForm Grid and State Loss settings. Also, it enables you to select the editor’s Error Trapping and Compilation settings. Furthermore, it controls the Tooltips display. The following summarizes the General tab’s settings:
General tab’s Form Grid Settings
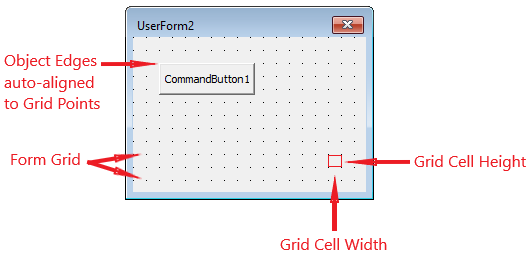
The Form Grid settings determine if a dotted grid shows on UserForms in Design mode. Also, they control the grid’s cell size by setting the number of points in its Width and Height (between 2 and 60). Moreover, they also let you auto-align UserForm objects with grid points, which improves design symmetry.
General tab’s ToolTips and Project Window Settings
Show ToolTips
Show ToolTips displays ToolTips for all toolbar buttons or icons. You’ll be able to see the tips when your mouse pointer hovers over any toolbar button or icon.
Collapse Proj. Hides Windows
Collapse Proj. Hides Windows lets you close all open windows on a project by collapsing its tree in the Project Explorer. However, expanding the project’s tree in the Project Explorer reverses the effect.
General tab’s Edit and Continue Settings
Edit and Continue settings comprise a single option, Notify Before State Loss. Once activated, a warning pops-up whenever a State Loss event occurs at runtime. Such an event causes a reset of the values stored in all module-level variables. An example of such events is clicking End instead of Debug when a Runtime error dialog pops-up.
General tab’s Error Trapping Settings
Error Trapping settings control how the editor handles runtime errors. However, they only apply from the moment you set the options onwards.
Break on All Errors
Break on All Errors triggers Break mode at each runtime error encountered. It works irrespective of the bug being in a Class Module or not, or if an error-handler (i.e., code-blocks that deal with runtime errors) exists for the anomaly.
Break in Class Module
Break in Class Module triggers Break mode at each unhandled runtime error found in a Class Module. Unhandled errors do not have an active error-handler. Furthermore, the editor enters Break mode at the erring code-line in the Class Module.
Break on Unhandled Errors
Break on Unhandled Errors triggers Break mode at each unhandled error found. It works regardless of the bug being in a Class Module or not. For unhandled Class Module errors, the editor enters Break mode at the code-line that invoked (or called) the class’ erring procedure. This differs from the Break in Class Module option, where the editor enters Break mode in the Class Module itself.
General tab’s Compile Settings
Compile settings comprise a single option, Compile On-Demand. A single sub-option, Background Compile, nests beneath the Compile On-Demand option. Together, they let you control how the editor compiles source code at runtime. As you’ll see below, activating both options increases your code’s execution speed.
Compile On Demand
Compile On Demand mandates that procedures compile in an as-required manner. That means that a procedure only compiles right before its execution. So, if one procedure calls another, the called procedure only compiles when the calling procedure runs up to the calling line. However, if this option is inactive, all project procedures must first compile before any runs.
Background Compile
Background Compile lets the editor use idle processor time to compile the procedures. This idle-time compilation occurs in the background, while already compiled code runs in the fore.
The Options Dialog Box’s Docking tab
The Options dialog box’s Docking tab lets you select (or deselect) dockable editor windows. Docked windows are those displayed in a fixed position. Windows typically dock to an edge of the editor or other docked windows.
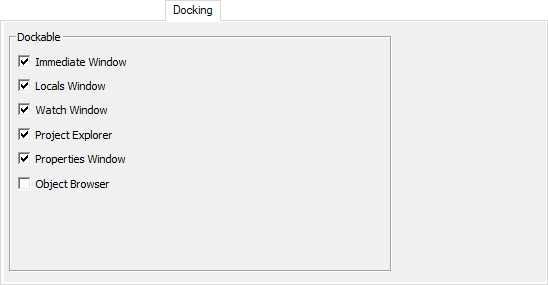
Docked windows recoil to their previous location when you double-click their title bar. In contrast, you can move undocked or floating windows anywhere, even outside the editor.
The Long and Short of It
Like most developers, you’ll want to set up your VBA editor in a manner that best suits your style or workflow. Excel supports a plethora of VBA Editor customizations to help you do just that. In this article, you’ve explored the VBA editor’s Options dialog box and the many VBA editor customizations it avails you.
This article is one in a series of three on VBA editor customization. Listed below, for easy reference, are the links to the other posts in the series:
- VBA Editor Customization: Menus, Toolbars and Toolbox
- Customizing Projects using the Project Properties Dialog Box
Now, before you run off to make any alterations, remember that all VBA editor customizations in Excel also apply to the editors of all other Office applications on your computer.


![The While – Wend statement’s syntax. Square brackets, [ ], indicate optional items.](https://masterofficevba.com/wp-content/uploads/2021/03/While_Wend_Statement_Syntaxnew.png)
![The Do – Loop Until statement’s syntax. Square brackets, [ ], indicate optional items while vertical bars, |, indicate mutually exclusive items.](https://masterofficevba.com/wp-content/uploads/2021/03/Do_Loop_Until_Statement_Syntaxnew.png)
![The Do – Loop While statement’s syntax. Square brackets, [ ], indicate optional items while vertical bars, |, indicate mutually exclusive items.](https://masterofficevba.com/wp-content/uploads/2021/03/Do_Loop_While_Statement_Syntaxnew.png)
![The Do Until – Loop statement’s syntax. Square brackets, [ ], indicate optional items.](https://masterofficevba.com/wp-content/uploads/2021/03/Do_Until_Loop_Statement_Syntaxnew.png)
